Monday, 30 June 2014

BEAN CURD (Tofu) IN OYSTER SAUCE


Bean Curd or Tofu also known as soya curd, a product similar to soft cheese, is derived by curdling soya milk. Tofu has numerous health benefits. It is a good meat substitute and a great food for vegetarians. Tofu is an excellent source of amino acids, protein, iron, calcium and vitamin E. Consuming tofu helps to lower bad cholesterol and reduces the risk of cancer..

Tofu is very high in fiber, and low in calorie. Rich in calcium this product is dairy free, as it is derived from beans. So if you are lactose intolerant, or allergic to dairy or milk products tofu is an excellent way of adding the goodness of dairy(such as iron, calcium and protein) into your diet. Tofu acts as an anti -ageing and helps in development and maintenance of stronger bones.

 
As a stand-alone food Tofu is quite bland, but is a wonderful flavor carrier. It absorbs flavor beautifully when dunked into curries and sauces and super soft. It is mostly used in south-east Asian cuisines and an awesome ingredient for stir -fried dishes.

Today's recipe is a quick and easy stir -fried Bean Curd or Tofu in Oyster Sauce. This is a delicious dish that I cook for my kids with combination of veggies. There is no onion or garlic used in the recipe hence this is an absolute vegan's delight. As mentioned, this is a kid's friendly meal but adult friendly too.. so a bowl full of nutrition for the entire family.


You will need:

Tofu 250 grams (drain water from packaging, press tofu to drain excess water, and cut into cubes)
6 spring onions chopped into 1 inch length.
1/2 cup of cauliflower and broccoli florets
1-2 sticks of celery sliced diagonally if you like.

1/2 cup mushrooms halved.
Red Capsicum (seeds removed and cut into chunks) (I did not use) 
3/4 cup of baby corn spears.
1 carrot cut into chunks
1(100ml) cup of water or chicken stock
2 -3 cubes or tsp. of chicken stock powder (if using plain water)
2-3 tablespoon of cornflour
3 tablespoon of oyster sauce
1 tablespoon of light soya sauce
1 tablespoon of dry sherry or rice wine vinegar
2 tablespoon oil


Step1: Take 1 tablespoon of oil in a pan or wok ( u may use a Chinese wok for this) and fry the tofu until golden. Remove and set aside.

Step2: Heat remaining oil in pan, add celery, carrot,baby corn, mushrooms, spring onions sauté for 2 minutes, add cauliflower and then broccoli. Saute for another 2 minutes or so.

Step 3. Add the bean curd or tofu to pan, toss lightly.

Step 4. In a separate bowl combine chicken stock/water along with stock cubes, soya sauce, cornflour, oyster sauce and sherry or rice wine vinegar. Mix all ingredients well and add to the pan or wok. Stir until sauce boils and thickens.

Tofu by it's nature soaks up liquid. So you may want to adjust the amount of chicken stock or water in order to achieve the desired consistency of the sauce. Serve warm with steamed rice or fried rice!


Enjoy and have a wonderful week ahead!

Thank you for stopping by. If you like this post  leave a feedback. For regular updates on more mouth-watering and exclusive recipes  "LIKE" my page on facebook

With deep care

EAT as you LIKE..


Thursday, 19 June 2014

MEXICAN STYLE CHICKEN and TOMATO SOUP


Winter is just upon us here in Adelaide . Once again it is time to warm up with  a bowl full of comfort, health and happiness. The refreshing chill in the air , the winter sun, a warm shower on a cold winter night and one-pot wonders bubbling away on the stove  is sheer happiness to me after a long day.. Winter is the season of soups, casseroles, curries, roasts and the like. What's your winter comfort food? We would love to know about it.


Today's post is the Mexican Style Chicken and Tomato Soup. It is a very simple to follow recipe packed full of flavours. This is an absolute kid and family friendly too. This recipe should yield 4 generous servings.

You will need :

6 Chicken Wings (skin on)- you may remove skin if you like.
2-3 canned diced tomatoes
1 large red capsicum roasted( see step 1)
4-5 spring onions finely chopped
2 cloves of garlic crushed
1/4 cup button mushrooms, sliced.
1-2 tablespoon of olive oil/ or butter/ or any white cooking oil
coriander leaves a bunch (roots removed, stems and leaves finely chopped, some leaves set aside for garnishing)
1-2 teaspoon dried parsley
2-3 Chicken stock cubes/2-3 teaspoons of stock powder
Chilli flakes ( as much as you dare!) - not recommended for kids version of the soup
400 ml or 4 cups of water or stock (if not using ready to use stock powder).
Salt and pepper to season
Feta Cheese to garnish
Lemon juice to finish.
Some crusty bread or corn chips to serve.


Method:

Step1:Preheat Oven to 200 degrees. Place your Red Capsicum in a baking dish, drizzle olive oil and roast at 200 degrees until the skin starts to blacken and ready to peel off. This should take around 30 mins or so.
 
Step 2:Meanwhile heat a pan ( I used my very reliable pressure pan) with butter or olive oil, start by frying the spring onions, chopped corianders, crushed garlic, chilli flakes  (if using). Sauté for 2 minutes or so.
 
Step 3: Add the sliced mushrooms and cook until the mushrooms start to soften and loose colour.
 
Step 4:Add the chicken wings and let the skin brown a little. The flame should be medium at this stage.
 
Step 5:Once the wings start to brown, add in the canned tomatoes, add stock powder, water or chicken stock if using. Give all a good stir, cover and cook until the wings have cooked thoroughly. You will know when the meat separates from the bones.
 
Since I used a pressure pan I cooked until 3 whistles. Turn off heat and let the pressure reduce on its own. 
 
Step 6: By this time the capsicum should be ready to be removed from the oven. Carefully remove the baking dish from the oven using an oven gloves. The capsicum should look very tender and it should be quite easy to peel off the skin.
 
Allow the capsicum to cool and then remove skin and finely slice or chop it.  
 
Add the roasted capsicum including any juice or oil from roasting into already prepared soup in pan and mix gently.
 
Dish out your soup, season with salt and pepper, squirt of lemon juice and garnish with the crumbed feta cheese, more coriander and chilli. You may even use grated or shaved parmesan cheese for garnishing. Be mindful of the amount of salt you use to season, as feta cheese is quite salty and chicken stock will also have good amount of salt content.

 
For a kid friendly option just leave out the chillies and your little ones will love it. The juicy and succulent chicken wings steal the show!
 
To make it more appealing serve with some crusty bread, or some Mexican corn chips to munch on.
 
Alternatively, if you prefer to have a smooth blended texture that is fine too.. although I like it as is. Remove the bones from the chicken and blend everything together. To add extra body to your soup or to achieve a thick soupy consistency add potatoes, or rice or pasta while cooking and blend before serving. Garnish as in above.
 

Enjoy and have a wonderful weekend !

If you like this post  leave a feedback. For regular updates on more mouth-watering and exclusive recipes  "LIKE" my page on facebook

With deep care
 

EAT as you LIKE


You may also like:


http://eatasulike.blogspot.com.au/2014/01/roasted-red-capsicum-and-butternut-soup_21.html

Tuesday, 3 June 2014

CHAR-GRILLED PINEAPPLE CHICKEN

 
It's been almost three weeks that I have been away since my last post. Happy to be back finally with this very simple, yet delicious Asian style Char-grilled Pineapple Chicken. Healthy eating does not need to be boring. You can spice it up with layers of flavour and still enjoy a palate full of scrumptiousness. 
 
But first of all my question is, do you like Pineapples? For me, Pineapple is one of my favourite fruits. It is such a versatile fruit isn't it? It is delicious as a snack or on breakfast cereals, and on the other, excellent for grilling, baking, in desserts and drinks. Did you know, pineapples have an enzyme that helps in tenderizing meat? gosh! what a winner.

In this recipe you can use fresh fruit cut into chunks, but I have used canned pineapple rings. I like the sweetness and the texture of the fruit soaked in the syrup and most of all it is convenient. In a busy household like mine, there is no time for all the dramas of cutting and chopping the whole fruit. If you wish to use fresh pineapple chunks undoubtedly go for it. 
 

I have used a chargrilling pan to grill the chicken and pineapple chunks, you may use a BBQ grill or just a lightly greased non stick frying pan. What you could do, I did not, before marinating just lay your chicken pieces on one side of  a large baking sheet or a plastic wrap and cover them with the other side of the sheet or wrap and give your chicken chunks a few bashing (don't go crazy with it;)) just a light bashing with a rolling pin or a meat tenderizer. This will flatten and tenderize the meat pieces and help in even cooking.


The recipe and ingredients are as follows:

For the Chicken:

I have used 3 thigh fillets. You may use chicken breast portions as well.

1-2 fresh garlic cloves crushed and minced

seasoning of salt and white pepper

2 tablespoon juice of pineapple (from the can)

1 teaspoon light soya sauce

1 teaspoon Kecap Manis or any sweet soya sauce

1/2 red chilli (seed removed and minced)-(adults only)- not recommended for kids

minced coriander leaves (1 tablespoon)

juice of lemon (a wedge)

2 tablespoon of cornflour.

Kitchen Tong

Chargrilling pan (highly recommended)


mix and marinade with all ingredients ( except for the cornflour) cover and keep aside. I marinated my chicken for about 2-3 hours. More, the merrier. Overnight is best. (Remember, tenderizing your chicken just before marinating).


Now drain the excess marinade in a separate bowl (preserve the left over marinade to be added in the sauce later) and coat the chicken with the cornflour. Heat a chargrilling pan on medium to high and place your chicken pieces on the grilling pan. Cook each side on medium flame for atleast 3-4 minutes or until the meat looks charred and almost cooked through. Use a kitchen tong to flip your chicken pieces. Once your chargrilled chicken is ready set aside.


For the gravy:

1 can pineapple rings
1 tablespoon any cooking oil (olive, canola, peanut, sesame oil)
1 qtr spanish onion chopped finely
2 spring onion whites slit diagonally as in the picture
1/2 of red and green capsicum chopped into cubes
1 medium carrot sliced diagonally. 
1/2 red chilli and sliced. Other half you may use for garnishing. If you do not want the heat from the chillies, but yet use it for flavour slit from the middle and remove the seeds. Now mince or slice as required (not recommended for kids)
2-3 cloves of garlic finely chopped or minced.
A non-stick wok or a skillet, a chinese wok is excellent for a dish like this.

for the sauce:
in the bowl of the left over marinade mix 1 tablespoon of light soyasauce, 1 tablespoon of kecap manis ( or sweet soya sauce), 1 tablespoon of sweet chilli sauce..(ohh, my mouth is watering already !;P). Mix everything well and set aside.

1-2 teaspoon  honey, juice of lemon ( a wedge or two)

fresh coriander leaves, or spring onion greens and red chilli for garnishing.


Step 1. Heat oil in a wok or a pan, add garlic, red chilli, onion and spring onion. Sauté for 1 minute or so until fragrant

Step 2. Add the carrots and capsicum. Sauté for another 2 minutes.

Step 3. Add your chargrilled chicken, give it a good coating with the onion, garlic and chilli , now add the sauce. Coat your chicken pieces well, cover on low to medium heat for about 4-5 minutes, The veggies should not be overcooked and should still mentain their crunch!

 
For the Pineapples:
 
Step 4: Meanwhile reheat your chargrilling pan in which you had cooked your chicken, once hot on medium place your pineapple rings on pan, cook each side for 2-3 minutes until they look charred . Take care not to burn them too much else they will turn bitter. Once ready slice them roughly and add to your chicken. 


Step 5: Mix your chargrilled Pineapples gently with the chicken and sauce to coat. Drizzle 1 -2 teaspoon of honey and lemon juice. Turn off heat. Allow to rest atleast for 2-3 minutes.

Step 6 : Garnish with some coriander, more chillies, and spring onion greens if you like.

Your Chargrilled Pineapple Chicken is ready to be served. Enjoy on rice, noodles, or may be sandwich in between burger buns or simply wrap into a tortilla!


This dish will not have a very heavy gravy. It is a semi dry dish, with the spicy thick sauce clinging onto the chicken, pineapples and the veggies, simply Yummm!

For those of you, who are not using a chargrilling pan, you may simply add the pineapple chunks (canned variety) straight after adding the chicken. If you wish to use fresh Pineapple chunks you may want to add them before you add the chicken pieces. I personally would recommend the canned variety for this recipe. Simple, easy to use and loads od flavour.

 
Pineapples are rich in Vitamin C , have loads of dietary fibre and manganese. Manganese is good for our bones and brain development. For a Kid friendly recipe just leave out chillies whereever it's been added ( I have highlighted in red) and your kiddos will love this one. Pineapples can sometime cause allergy so please be careful before offering to your little ones.
 

Enjoy and have a wonderful week ahead !

Dear readers, thank you for stopping by. If you like this post  leave a feedback. For regular updates on more mouth-watering and exclusive recipes  "LIKE" my page on facebook

With deep care
 

EAT as you LIKE..


Thursday, 15 May 2014

CHETTINAD Chicken Curry


Chettinad Chicken is among the most popular chicken curries that gets it's origin from the Chettinad region in the southern state of India, Tamil Nadu. This fiery rich curry gets it's flavour and heat mostly from the freshly ground aromatic spice blend, grated coconut and  the curry leaves  and very generous amount of red chillies used to make the masala. However, you can definitely go a bit easy on the chillies.

Chettinad Chicken happens to be one of my favourite curries . Reason!? The use of curry leaves and coconut that makes this dish special and most of all my immense love for South Indian food of course! Be it Dosa, Idli, Uthapam, Sambhar,you name it and I am a game for it.


My version of Chettinad Chicken is very mildly spiced as we do not prefer much heat in our curries. Use of curry leaves and grated coconut as I mentioned before  is a must in this recipe.I have used cashew paste that adds a creamy texture to the curry you can even use poppy seed or melon seed (charmagaz), roasted chana dal paste instead of cashews.
 
As a thumb rule whenever cooking chicken dish of any kind, I always prefer to score and marinate meat at least for an hour if not more. It helps the flesh to absorb the flavour of the spices to the max and as an outcome you are richly rewarded with juicy, tender and more flavourful meat pieces.
 

Lets get to the recipe. The list of ingredients might give you a shock:P But, it's honestly worth the effort and quite conveniently available in every kitchen pantry.
 
To make Chettinad Chicken Curry you will need:

6-8 Chicken drumsticks, skin removed, rinsed and dried.
3-4 tablespoon oil for cooking and extra 1 tablespoon to marinate.(I used canola oil)
salt to season your curry and 1 teaspoon extra to marinate.
8-10 curry leaves for tempering
a pinch of hing or asafoetida
1 medium red onion finely chopped
1 large tomato finely chopped or grated.
1 teaspoon red chilli powder
1/2 teaspoon turmeric powder
1 teaspoon sambar masala
1/4 cup warm water
Lemon or lime juice
To garnish some broken cashew nuts and optional - freshly chopped coriander leaves.
 
For the Dry Roasted Masala you will need :
1/4 cup of grated coconut.
1/2 star anise
1 teaspoon cumin seed
1 teaspoon coriander seeds
3-4 black peppercorns
6-7 dry red chillies, more if you like
12-15 curry leaves
3-4 green cardamom pods
2-3 cloves
1 medium cinnamon stick
1 small ginger roughly chopped
10-12 cloves of garlic
10-12 cashew nuts.
2-3 tablespoon cooking oil to make a paste.
Dry roast all ingredients in a skillet or a frying pan above and make a paste. 


Method:

Step 1: Take your chicken pieces in a bowl and make slits on the flesh ( or score) with a sharp knife. Rub your chicken pieces with oil and salt.

Step 2: Add the ground masala blend and rub all over your chicken pieces, marinate and keep aside. I marinated my chicken overnight, but 5-6 hours is good enough. If you are too pressed for time just an hour is good too.


Step 3: Heat oil on high in a thick bottomed vessel. Turn down heat to medium and quickly add curry leaves and a pinch of hing. (At this stage you can set aside a few tempered curry leaves for garnishing)
 
Step 3:  As the curry leaves splatters add the chopped onion. Once onion start to soften and change colour to golden add the marinated meat along with any leftover marinade. Cook for 2-3 minutes add red chilli powder, turmeric powder, sambhar masala and cook until the masalas are cooked and fragrant.
 
Step 4: Add chopped or grated tomato. Mix well with the chicken and the masalas. Stir and cook well at least for 2-3 mins and cover on medium flame. By now you will see oil and masala  has separated and the chicken is almost cooked through. Add a little warm water, depending on the consistency of the gravy you want. The gravy should be thick, semi dry and not too runny.
 
Step 5. Do a taste test and adjust seasoning of salt as desired. Cover and cook for 5 mins.
 
Step 6: Garnish with some broken cashews and the curry leaves you had set aside(in step 3). You may even use freshly chopped coriander leaves but I prefer not to, let the curry leaves do the magic!
 

Finish off with a squeeze of lemon or lime juice. Dish out and enjoy Chicken Chettinad Curry at it's best accompanied with some steamed basmati rice, pilaf, dosai or any Indian bread. Happy days!
 
 
Enjoy..
 
Dear readers, thank you for stopping by. If you like this post  leave a feedback. For regular updates on more mouth-watering and exclusive recipes  "LIKE" my page on facebook
With deep care

Indrani..

You may also like:

http://eatasulike.blogspot.com.au/2014/07/malabar-prawn-curry.html


Tuesday, 6 May 2014

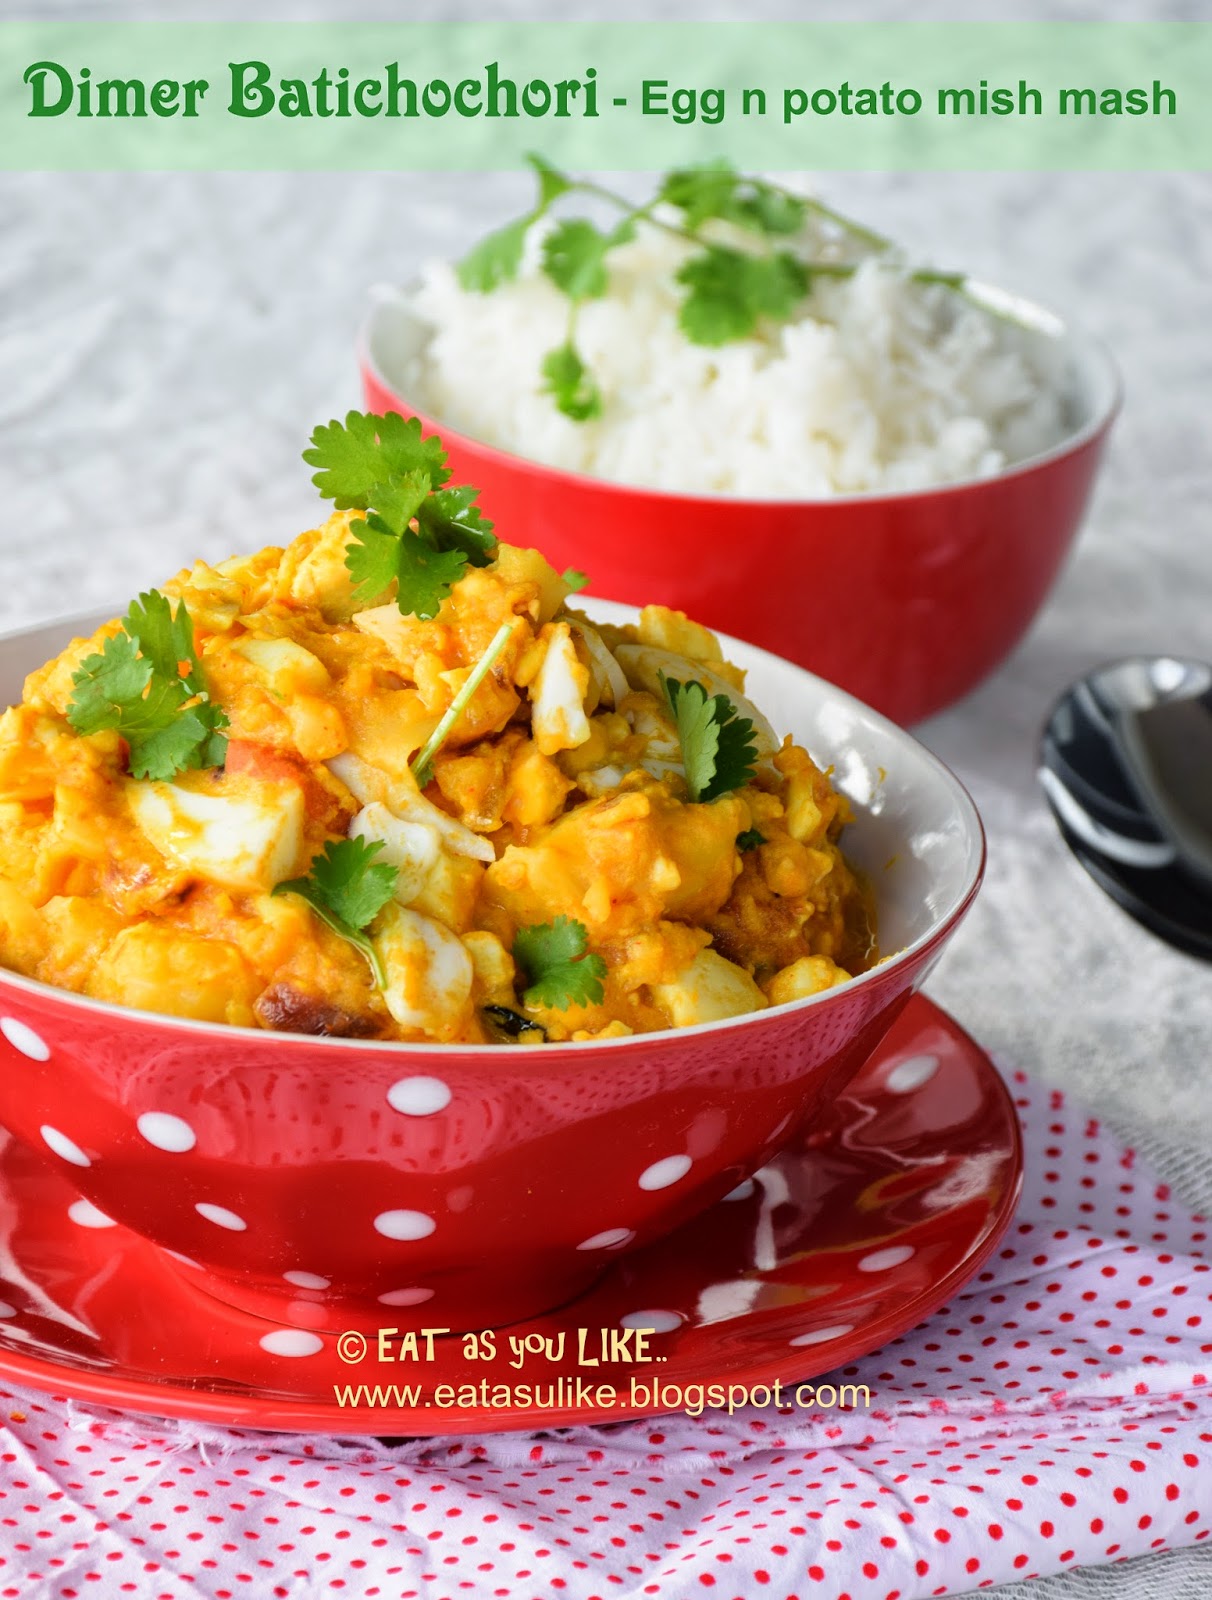
DIMER BATICHOCHORI (Egg n Potato Mish Mash)

 
"Batichochori" or a 'Mish Mash' if you roughly translate it in english, is a very popular Bengali preparation where all ingredients are cooked in one- go flavoured with minimum spices and mustard oil. Yes, mustard oil is a must for that added zing. Very essential for any typical bong preparation. As I have mentioned previously that any other kind of oil used will be a compromise! It is an absolute fuss free, simple to cook dish. This dish can be created using fish, shrimps or just potatoes on its own. I have had all these variations of a batichochori before but this time it was with egg. When I came across this recipe it was very unique to me as I had never heard of or thought of (to be more precise) "Dimer Batichochori", a spicy 'Egg and Potato Mish Mash.' "It is a super easy comfort food for all the egg lovers like me, as said by my friend and owner of this recipe Ms Kolpita Basu, from Mumbai, Maharashtra."
 
 
Recipes that are unique and easy to-do always attract me and I am always on the prowl looking out for one. Moreover, it is a lifesaver when you only have eggs and potatoes left in the pantry or you want to have a real quick fix dinner ready on the table. When I tried this dimer batichochori I was absolutely in love with it's simplicity and yet the delectable taste. The semi mashed eggs and potatoes cooked along with the spices add a beautiful texture and softness to the dish. Without wasting any more time, I approached Kolpita for her consent and here is the recipe for all my readers. Try once, you would want to repeat this again and again!
 
Kolpita, Thank you sooo much for sharing this recipe with us. I am sure all readers of Eat as you Like will fall in love with your "Dimer Batichochori" just like me and my family. This is now a very frequently cooked egg dish in my home. Thank you once again :)


For making Dimer Batichochori I followed Kolpita's recipe from start to end except for a few minor changes in between. So here is the recipe:

To make Dimer Batichochori you will need :

5-6 hard boiled eggs, peeled and set aside
1 large onion sliced or chopped
7-8 cloves of garlic finely chopped
1 small-medium sized ginger finely chopped
1 tablespoon turmeric powder
1 tablespoon red chilly powder
1 large tomato chopped (optional)
4-5 tablespoon of mustard oil
4 medium potatoes, peeled and diced
2-3 green chillies finely chopped or more if you dare
Freshly chopped coriander leaves for garnishing
and extra mustard oil for serving
Salt to taste.


Step 1: In a wok or a thick bottomed pan heat mustard oil on medium flame, now add the onions.
Step 2: Once the onions start to change colour and look translucent add the potatoes and keep frying.
Step 3: Add ginger, garlic and green chillies finely chopped.
Step 4: Keep cooking for a while and once they are nicely stir-fried add the chopped tomatoes.
Step 5: Add the eggs. Add the spices such as turmeric, chilli powder.
Step 6: Keep stirring and mixing all the ingredients and breaking the eggs down roughly with a spatula. Cover on low-medium flame. 
Step 7: By now the tomatoes should soften, add a little warm water, cover and cook until the potatoes are cooked and soft. Add seasoning of salt.
Step 8: Remove lid, check consistency. It should have a mashed look. You may even like to break down the potatoes a bit. Depending on how much gravy you want you may add some more warm water. The dish is more mashy and semi dry and not very runny. Garnish with coriander, some more green chillies and a drizzle of mustard oil.


Serve with steaming hot rice, any bread such as Roti or Chappati or even Luchi (puffy Indian deep fried bread) or as my friend says sandwich it between bread slices and enjoy!


Dear readers, thank you for stopping by. If you like this post  leave a feedback. For regular updates on more mouth-watering and exclusive recipes  "LIKE" my page on facebook


With deep care


Indrani..


You may also like:

http://eatasulike.blogspot.com.au/2014/04/kalakand-milk-cake.html


01 10