Sunday 22 December 2013

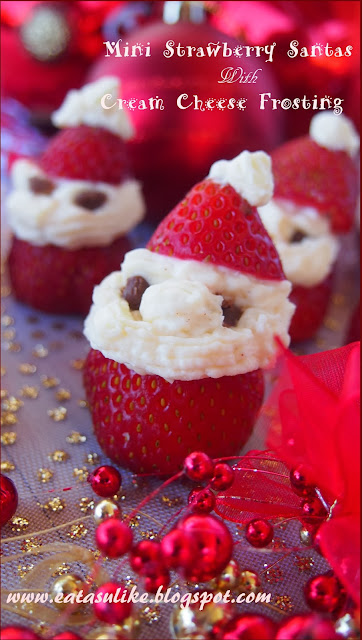
STRAWBERRY SANTAS WITH CREAM CHEESE FROSTING


As the weather warms up we are all busy with our last minute preparations for the Christmas Day. What are your Christmas plans? We would love to know about it.
So, today’s post is a very simple and easy Christmas dessert. It is definitely hard to get creative with your main menu, but when it’s turn for desserts let your imagination go wild. Make your little one’s Christmas extra special this year with these cute little Strawberry Santas. These mini Santas are a great combination of the strawberry fruit and cream cheese with teeny weeny bits of chocolate. As I was browsing for some Christmas dessert ideas I came across these cuties on the Best Birthday Wishes website. Although I couldn't figure out any recipe neither I can find the link anymore. But, will update once I am able to discover.  
 

To make Strawberry Santas you will need:
20 strawberries of good size and shape
250 grams of Cream Cheese at room temperature (just soft enough to mix with a spoon)
1 teaspoon of cinnamon powder
2 tablespoon of lemon or lime juice (strained)
Few drops of Vanilla essence  (optional)
3-4 tablespoon of caster sugar
A piping bag with star nozzle
Mini choco chips for eyes .
Step 1
In a bowl mix cream cheese, cinnamon powder, sugar ,lemon or lime juice and vanilla essence. Mix well  with a spoon. Set aside.
Step 2
Spoon the cream cheese mixture into the icing bag .If it starts to melt too much, refrigerate till the time you get the strawberries ready.
 
Step 3
Slice out the bottom of the strawberry just a little to make a flat even base.


Step 4
Cut out the hull from the top to make a hat as shown in the picture and set aside.
Step 5
Arrange ready strawberries on a platter and swirl frosting with a piping kit on the strawberies as shown below to make the face. If u leave the cream cheese frosting in the fridge for too long it will set. In that case you may defrost the frosting by placing the piping kit in microwave for 10 seconds or let it sit in room temperature to get the desired result. The frosting should not be of dropping consistency.
Start by piping two rounds of frosting more towards the front for the beared sticking out and then pipe a few rounds more towards the inside to make the face. Repeat for the rest of the strawberries 

 
Step 6
Stick the hulled strawberry on top to make Santa’s hat. Pipe some more icing on the tip of the hat to make a pom pom. Repeat for the rest of the strawberries
If your frosting starts to melt too much slide it into the fridge for a while to set.

 
Step 7
Meanwhile gently halve the Choco chips for eyes. Tuck in the tiny bits of choco chip into the frosting to make eyes for Santa.
Step 8
Dab a little nose in between eyes.

Note: If you want you may even use dark chocolate icing to dab tiny dots for eyes or even tiny bits of raisins for eyes.

These adorable mini desserts make a great nibble for your Christmas Party. Do g ive them a go!!


Enjoy….

Thank you for stopping by! If you like this post please leave a feedback. For regular updates on more mouth-watering and exclusive recipes  "LIKE" my page on facebook


With deep care


EAT as you LIKE..
 

Tuesday 17 December 2013

CHRISTMAS ROAST CHICKEN


25th December, Christmas Day is just around the corner. It is such a beautiful time of the year to connect and celebrate with friends and family. People are rushing about doing their last minute shopping, tinsel and lights adorn the malls and homes everywhere, it is nothing unusual, it is just about Christmas!
 
It is this special time of the year when everybody irrespective of their age love to give and receive gifts. Last few weekends have been really busy shopping Christmas presents for our little ones. Finally that bit is over. The Christmas Tree is all decked up, the electric lights are up on the patio , the presents have been wrapped and kept ready. So we are pretty much set for this festive season. It is a week long break till the new years so looking forward to some quality family time together.
 
As Christmas rolls around, more than just decorations though, it is also about celebration of food of different kinds. Starting from traditional roasts, grilled prawns to puddings and many more. It is never too early to plan your special Christmas lunch menu. So today's post is about one such recipe. If you would like to try out something special this Christmas try this Roast Chicken. This was our Christmas Day Lunch last year. It is a very simple and easy  recipe to follow.
 
 
So, lets take a look at the recipe.
You will need :
  • 1 whole Chicken, skin on medium size
  • Olive Oil for basting (3-4 tablespoon)
  • 2-3 tablespoon of lemon juice.
  • Salt and freshly ground black pepper for seasoning
  • Butter 6 small cubes
  • Lemon slices 6 nos
  • garlic cloves, peeled 3-4
For Stuffing you will need :
  • 1 cup mushroom (medium button or swish brown), sliced
  • 1 cup Sultanas
  • 1/2 cup sundried tomatoes( see notes at the end of the recipe)
  • 6-7 Basil leaves
  • 1/2 small cup walnuts
  • Butter, 2 tablespoon
  • 3-4 spring onions chopped 
  • 2-3 garlic cloves finely chopped or grated.
  • 1/2 cup good quality bread crumb
  • 1 egg
For the Gravy
  • 1 stick of celery, halved
  • 1 bay leaf
  • handful of chopped coriander
  • enough water, or chicken stock to cover  atleast three-fourth of the chicken.
Step 1
PREHEAT OVEN at 250 degrees.
Step 2
Firstly, chuck off the chickens bottom and the loose fatty skin around the area, just as shown  in the picture below. You will also need to clean the cavity. Once done, gently rinse the bird under very thin stream of running water,  pat dry with a kitchen towel and place the bird on a baking dish, breast side up. Tie the legs with a kitchen string. This will help the bird to retain it's shape even after roasting.
Step 3
In a bowl mix olive oil, lemon juice, salt and pepper. Do a taste test and add more seasoning of salt if needed. Baste this mixture very well with a brush all over the bird. Loosen the skin on top  with your  finger tip and brush the oil under the skin all over including the leg and thigh areas. Cover with a cling film and let it rest till you get the stuffing ready.
 
 
Step 4
  • heat butter in a frying pan and add chopped garlic and spring onion.
  •  Once the spring onion starts to soften add the mushrooms. Cook till the mushrooms change colour
  • Add the walnuts, sundried tomatoes, basil and cook for another 5-6 mins. Season with very little salt and pepper. Turn off the heat and let the mixture cool down.
  • Put the mixture in to the food processor and turn on pulse in order to  slightly crumble the nut mixture. The idea here is to lightly crush the walnut while leaving a few chunky bits. We do not want a smooth paste here. Your blender on low speed is also good enough to do this job. Transfer into a large bowl.
Step 5
  • To the above add the sultanas, bread crumb and egg and combine well. Stuff this mixture into the chicken's cavity by pushing towards the neck cavity. (see notes at the end of the recipe)
 Step 6
  • Slide in 2 slices of lemon, 1 garlic clove  and 2 cubes of butter, each under the skin on the breast area and both the drumsticks, as shown in the picture. Let the chicken rest in a baking dish breast side up. 
Step 7
  • Throw in coriander, celery, half a lemon into the baking dish. Pour enough water or chicken stock  to cover three-fourth of the chicken. If you want you may even use chicken stock cubes to add to hot water. Once the cube dissolves in water pour into the baking dish. 
Step8
  • Slide into the oven at 210 degrees for about 90 mins. Keep checking  at regular interval. In case  you see the stock drying out too much add more water or stock. Once the skin looks crispy and golden brown it means your chicken is done. To check insert a sharp knife into the thickest portion of the thigh- the juices should run clear.
 
So after about 90 mins, Voila!!  Use oven gloves to carefully remove chicken from the oven. Place dish on a placement mat away from the kid's reach. Cover with double layer of aluminium foil and let the meat rest for about 15-20 mins. 
 
 
Carving the Roast Chicken
 
After 15-20 mins or so transfer the bird on a big enough serving platter or a clean cutting board. Remove the strings and discard.
  • You will need a large  surface area to carve the meat. Portion the chicken by cutting through the skin and the joint in between the thigh and the drumstick. Pull the leg away from the body and cut through the joint. Repeat on the other side.
  • Similarly pull the wings away from the bird and cut through the joint closer to the breast.
  • Repeat for the other wing.
  • Using the tip of a  sharp knife cut along the breast in between the legs into half. Working from the tail end of the bird and moving up towards the wing end.  
  • Slice the meat as required

 Now for the Gravy
  • discard the celery stick and squeeze the lemon gently into the left over gravy in the dish.
  • pour the gravy into a gravy boat and serve along side the chicken. 
  • Serve your roast chicken with fresh lemon wedges and salad of your choice.
Any left over meat can be frozen to be used later in sandwiches, soups, rice, noodles, what ever you like. I hope this Christmas brings in a lot of joy and happiness and you have a wonderful time with your near and dear ones!
 
NOTES:
 
If you do not have sundried tomatoes, try adding 1-2 roasted red capsicum . Just coat a whole red capsicum with olive oil, season with salt and pepper and roast in the oven for about 15 mins or until cooked through. you will know when the skin starts to peel off it is done. Remove from oven and allow time to cool down. Then peel off  the skin, discard any seeds, roughly tear and add to the stuffing mixture at step 5.

Enjoy….

To stay in tune with what's cooking in my kitchen "LIKE" my page on facebook and "SHARE" this recipe to "SAVE" it  to your wall.


With Care

EAT as you LIKE..

Monday 9 December 2013

PIZZAMANIA #1 Spicy BBQ Chicken or Prawn


Welcome to my Pizzeria. Eat as you Like!!

Does that give you a run?? LOL; Just Kidding. I don't  own one yet, but neither do we get pizza takouts for our dinner anymore. We bake our own pizzas.Yes! and from that time we have never looked back.
Unless it's a real good gourmet pizza from some good Italian hang out. But, that is only occasional. For my money I like my own, fresh and sizzling from the oven.
Once you discover the secret of baking your own pizza at home you will have to agree that it is many times better than any casual take out.You can choose your own sauce, toppings, add as much toppings as you like, more cheese, and just the right taste loaded with full flavour to say the least.

Great for your Friday nights or weekends or may be whenever you are just not in a mood to cook anything elaborate. Just slump back on your couch with a glass of wine, put your feet up and bite on to a spicy tangy cheesy slice.

Perfect party food. Layer your pizzas and keep it ready just prior to your guests arrival. Pop it in the oven before serving. It is sure to impress!

To keep things simple I  use store bought pizza base. Never tried my hands yet on making a dough. One day, may be! There are plenty available in the market. Thick crust, thin crust, low fat , more fat , choose your own base. I always have a couple sitting in my fridge. Quite handy for those real last minutes. 


There is no perfect recipe for making a pizza at home. Use your own creative ideas.You will just need some clever toppings, good quality pizza cheese, choice of sauce and your delicious pizza will be ready in minutes.Even the husbands can do it!The purpose behind this post is just to share a few ideas. I hope you like them.
 
It is a also an excellent way to engage kids in food preparation. Although it can get a lil messy, but they love it. My little chaffy daughter, her favourite is to layer "chiishh" (cheese) on "pissha" (pizzas) as she would say.  This way they feel more involved being part of the family, eat well, and this also helps in boosting their self confidence. Moreover I don't have to stress about feeding them. And because it is home-made you can flavour it up as they would like and share it guilt free.
 
So, today's recipe is a Spicy BBQ Chicken Pizza. For a BBQ Prawn just replace Chicken with Prawns.
 
You will need:
 
A Round Pizza Base medium (approx. 8 slices)
1 tablespoon Olive Oil to brush on the base
Chicken breast ( cut in to strips lengthwise, approx. 24 nos, 3 per slice)
Good quality Pizza Cheese( I use a 4 Cheese blend: Mozzarellas ,Tasty Cheddar and Romano.)
 
To marinate your chicken you will need:
 
Chicken pcs( as above)
1heaped teaspoon garlic paste
1/2 teaspoon ginger paste
1 teaspoon Hot Chilli sauce- Optional (if making for kids use a mild, or sweet chilli)
1 teaspoon Crushed Chilli paste ( for more heat, optional )
2 tablespoon BBQ sauce
1 teaspoon Dijon mustard ( or any light mustard paste)
Freshly ground black pepper to season. 
1 tablespoon chopped coriander
Wedge of Lemon to squeeze
Mix all ingredients with chicken or prawn, cover and set aside.


For Toppings you will need :
 
2-3 spring onions chopped or half red onion chopped
1/2 red and 1/2 green capsicum chopped
2-3 tablespoon Black (Kallamatta Olives) cut into small rings
Slices of fresh tomatoes (1 for each slice of pizza : 8-9 slices depending on the size of the base) 
Seasoning of salt and pepper
If you want you may, in 2 separate bowls coat the onions and capsicums with seasoning and olive oil.
 
For the Base:
 
A Pizza Tray
Place a round base on the tray as mentioned above (always follow baking instruction behind the pack)
Brush olive oil to cover the base. This will make the base crisp and prevent from burning.
Combination of Sauce:
1 tablespoon Romano cheese classic tomato pasta sauce ( or any other tomato sauce)
1 tablespoon BBQ sauce
(I have used a combination of two sauces here. You can use any one if you like, or anyother flavour sauce you fancy. e.g. Hoisin, sweet chilli, all work well)
Cover the base and spread the sauce evenly including the edge of the base. Use a brush or a butter knife.If you want spread a generous amount of cheese first before starting to layer your pizza. This step is OPTIONAL. Make sure to spread your cheese evenly on the base covering the edges.
 
PREHEAT OVEN at 250 degrees
 
Start layering your pizza. The step wise pictures below might be of help;
Step 1 :
Layer of sauce. Use one or combination of two.
Step2:
Spread your sauce well around the edges. Spread evenly.
Additional Step
Add layer of Cheese (optional).spread evenly along side of the edges .Not included in the picture
Step3:
Layer your onions and capsicums. Spread evenly on the base. Including the edges
Step4:
Arrange the tomato slices as shown in the picture.
Step 5:
Layer your chicken pcs and spread the olives . 3 pcs per slice.
Step 6
Spread cheese evenly to bind everything together. Sprinkle chopped coriander. Season with pepper.


Turn your oven temperature down to 200 degrees. Place your pizza tray in the oven. Bake as per instruction behind the pack of your Pizza Base).Mine said 10-12 mins.When the cheese has melted and starts to brown lightly from the edges you can carefully remove from oven. Always use oven gloves to remove tray from oven and place your tray on a placement mat or slide on a wooden pizza base. Sprinkle some more herbs if you like.


The Spicy BBQ Prawns with Capsicum, Tomatoes, Spanish Onion (Red Onion) . Too good to resist!


Try some variations:
Baking Pizza at home is fun! Make your own. Play around with colours, textures and flavours. The end product should look nice and taste good. That's it.The pizza below has a tomato sauce base and for toppings :Pineapple, bacon, mushrooms, sundried tomatoes and kallamatta olives.


The one above has tomato slices , Mushrooms Olives, Red Onions and Green Bell Pepper with a base of Chilli  BBQ sauce. It's a Vegan Options. You can even experiment with some store bought white sauces, such as Alfredo or Creamy Carbonara. (These are meant for pasta but great as a pizza base). More on this in my next post!

 
Hope you enjoy your favourite pizzas at home soon. Would love to hear about your special pizza story! I am already salivating looking at these pictures and drafting my post. My pizza craving needs urgent attention. Talk soon. Have a lovely day! 
 

Enjoy….

To stay in tune with what's cooking in my kitchen "LIKE" my page on facebook and "SHARE" this recipe to "SAVE" it  to your wall.


With deep care

EAT as you LIKE


01 10